- Veeam Support Knowledge Base
- How to Detect and Remove Separated Disks During Veeam Agent for Linux Restore
How to Detect and Remove Separated Disks During Veeam Agent for Linux Restore
Cheers for trusting us with the spot in your mailbox!
Now you’re less likely to miss what’s been brewing in our knowledge base with this weekly digest
Oops! Something went wrong.
Please, try again later.
Purpose
This article documents how to detect and clean up the restored disks of a Linux machine that used Logical Volume Manager (LVM), was backed up with Veeam Agent for Linux, and restored to a hypervisor VM or cloud computing platform.
This issue is documented in the following Veeam Agent for Linux user guide restore sections:
- Restore Veeam Agent backups to VMware vSphere VMs
- Restore Veeam Agent backups to Hyper-V VMs
- Restore Veeam Agent backups to Nutanix AHV VMs
- Restore Veeam Agent backups to Proxmox VE VMs
- Restore Veeam Agent backups to oVirt KVM VM
- Restore disks from Veeam Agent backups to oVirt KVM VM
- Restore data from Veeam Agent backups to Microsoft Azure
- Restore data from Veeam Agent backups to Amazon EC2
- Restore data from Veeam Agent backups to Google Compute Engine
Issue Summary
The following text is from the aforementioned Veeam Agent for Linux User Guide restore sections.
If the disk you want to restore contains an Logical Volume Manager (LVM) volume group (VG), consider the following:
- Since LVM volume group is a logical entity that spans across the physical disks, Veeam Agent treats the original disk and the LVM volume group as separate entities. Therefore, Veeam Backup & Replication will restore the original disk and the LVM volume group as 2 separate disks. This way, all data, including the data within the LVM volume group, is accurately restored.
- Restoring the original disk and the LVM volume groups as 2 separate disks requires an increased amount of storage space. For example, you restore a machine with 2 disks, and a separate LVM volume group is configured on each of these disks. In this case, Veeam Backup & Replication will restore 4 disks. The restored disks will consume the storage space equal to the size of the 2 original disks and the 2 LVM volume groups from these disks.
Challenge
Example Scenario
Initial Linux Machine Configuration Overview
- Disk sda: uses default partitioning for OS filesystems.
- Disks sdb and sdc: partitioned as sdb1 and sdc1 and used as Physical Volumes to create the pool for a Volume Group named vg00.
- Volume Group vg00: contains 2 logical volumes:
- lv_big: formatted as ext4
- lv_small: formatted as xfs
Commands to Review Disk Configuration
The following commands can be used to review the machine's disk configuration:
lsblk -fsblkidvgs; lvsdf -hTCommand Output Examples From Scenario Machine
root@linux-agent-host:~# lsblk -fs
NAME          FSTYPE      FSVER    LABEL UUID                                   FSAVAIL FSUSE% MOUNTPOINTS
sda1          ext4        1.0            06522eee-d6c7-48ec-bb21-bacd2aa2806b     10.9G    21% /
`-sda
sda2
`-sda
sda5          swap        1              415c86a1-4b25-4d64-8250-9d3084a95623                  [SWAP]
`-sda
sr0
vg00-lv_big   ext4        1.0            2a038489-a343-413c-88cd-7b458a9c43d7      9.2G     0% /big
|-sdb1        LVM2_member LVM2 001       82fr31-JedF-sQlA-ZIha-S27n-xXq6-EetU5C
| `-sdb
`-sdc1        LVM2_member LVM2 001       xnQ2CB-vufG-21Sq-h6yZ-mURX-jnV9-zIB3ce
  `-sdc
vg00-lv_small xfs                        1f7b4748-9380-4e09-8a0c-dc9dbf51b878      2.9G     2% /small
`-sdb1        LVM2_member LVM2 001       82fr31-JedF-sQlA-ZIha-S27n-xXq6-EetU5C
  `-sdb
root@linux-agent-host:~# blkid
/dev/mapper/vg00-lv_small: UUID="1f7b4748-9380-4e09-8a0c-dc9dbf51b878" BLOCK_SIZE="512" TYPE="xfs"
/dev/sdb1: UUID="82fr31-JedF-sQlA-ZIha-S27n-xXq6-EetU5C" TYPE="LVM2_member" PARTUUID="9ca89108-01"
/dev/mapper/vg00-lv_big: UUID="2a038489-a343-413c-88cd-7b458a9c43d7" BLOCK_SIZE="4096" TYPE="ext4"
/dev/sdc1: UUID="xnQ2CB-vufG-21Sq-h6yZ-mURX-jnV9-zIB3ce" TYPE="LVM2_member" PARTUUID="8e1b0552-01"
/dev/sda5: UUID="415c86a1-4b25-4d64-8250-9d3084a95623" TYPE="swap" PARTUUID="38687d75-05"
/dev/sda1: UUID="06522eee-d6c7-48ec-bb21-bacd2aa2806b" BLOCK_SIZE="4096" TYPE="ext4" PARTUUID="38687d75-01"
root@linux-agent-host:~# vgs; lvs
  VG   #PV #LV #SN Attr   VSize  VFree
  vg00   2   2   0 wz--n- 13.99g 1016.00m
  LV       VG   Attr       LSize  Pool Origin Data%  Meta%  Move Log Cpy%Sync Convert
  lv_big   vg00 -wi-ao---- 10.00g
  lv_small vg00 -wi-ao----  3.00g
root@linux-agent-host:~# df -hT
Filesystem                Type      Size  Used Avail Use% Mounted on
udev                      devtmpfs  2.9G     0  2.9G   0% /dev
tmpfs                     tmpfs     593M  736K  592M   1% /run
/dev/sda1                 ext4       15G  3.1G   11G  22% /
tmpfs                     tmpfs     2.9G  4.0K  2.9G   1% /dev/shm
tmpfs                     tmpfs     5.0M     0  5.0M   0% /run/lock
tmpfs                     tmpfs     593M     0  593M   0% /run/user/0
/dev/mapper/vg00-lv_big   ext4      9.8G  5.4G  3.9G  59% /big
/dev/mapper/vg00-lv_small xfs       3.0G  2.1G  955M  69% /small
Solution
Post-Restore Configuration Review
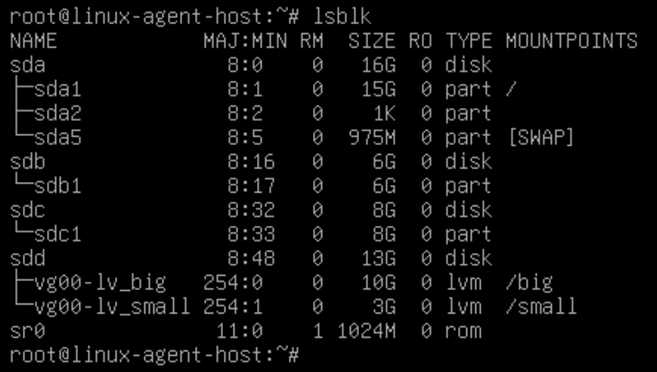
After performing the restore, review the restored VM's disk layout. You'll notice that in addition to the original disks, there will be new a disk for each of the VGs (Volume Groups) that is equal in size to the combination of all LVs (Logical Volumes) in each VG from the original Linux machine.
Example Restored VM Configuration
- Disk sda is restored as is.
- Disks sdb and sdc are restored, and their partitions (sdb1 and sdc1) are present.
- Disk sdd is new, and is sized to match the combined size of all LVs within the VG.
- The logical volumes lv_big and lv_small are mounted as expected.


Note: If there are multiple disks with the same size, use the command lsscsi to identify the SCSI nodes assigned to each disk and then correlate those to the VM configuration.
Example:
# lsscsi
[0:0:0:0]    disk    VMware   Virtual disk     2.0   /dev/sda
[0:0:1:0]    disk    VMware   Virtual disk     2.0   /dev/sdb
[0:0:2:0]    disk    VMware   Virtual disk     2.0   /dev/sdc
[0:0:3:0]    disk    VMware   Virtual disk     2.0   /dev/sdd
Based on this, we can see that /dev/sdd is SCSI node 0:3, which correlates to the following VM disk:

Detaching Unused Disks and Repairing LVM VG
After powering on the restored VM, attempting to execute any LVM commands results in warnings like:
WARNING: PV /dev/sdd in VG vg00 is using an old PV header, modify the VG to update.
WARNING: Device /dev/sdd has size of 27265024 sectors which is smaller than corresponding PV size of 13959692288 sectors. Was device resized?
WARNING: One or more devices used as PVs in VG vg00 have changed sizes.
Part 1: Detach the Unused Disks
These steps continue with the prior example of working with a Linux machine restored to a vSphere VM. You will need to adapt these steps when restoring to other hypervisors or cloud computing platforms.
After identifying which VM disks represent the unused disks, in the ongoing example, sbd and sdc, perform the following to detach them from the VM:
- Power of the restored VM.
- Edit the VM in a vSphere Client.
- Remove disks, but don't delete the disks.

- Save the new settings of the VM and start it.
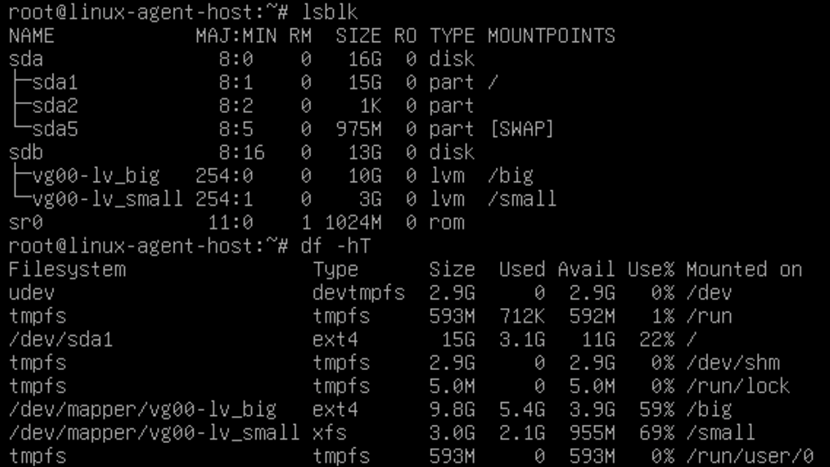
- Review the disk configuration and ensure that the filesystems are mounted properly using:
lsblkdf -hTNote that sdd is now listed as sdb.

Part 2: Clean Up LVM Errors
WARNING: PV /dev/sdb in VG vg00 is using an old PV header, modify the VG to update
- To resolve this first warning, excute the following command replacing the vg00 with the actual VG name.
vgck --updatemetadata vg00WARNING: Device /dev/sdb has size of 27265024 sectors which is smaller than corresponding PV size of 13959692288 sectors. Was device resized? WARNING: One or more devices used as PVs in VG vg00 have changed sizes.
These warnings occur because the VG (vg00) was initially made from multiple PVs, and now only a single PV is present.
- Fix this by running the following command, specifying the correct device and sector count from the warning:
pvresize /dev/sdb –setphysicalvolumesize 27265024s- The system should be rebooted to ensure all changes are committed.
- After reboot, ensure all volumes are mounted as expected.
- If everything is now functioning correctly with no further LVM warnings, the spare disks that were disconnected can be removed from the storage.
To report a typo on this page, highlight the typo with your mouse and press CTRL + Enter.
Spelling error in text
Thank you!
Your feedback has been received and will be reviewed.
Oops! Something went wrong.
Please, try again later.
You have selected too large block!
Please try select less.
KB Feedback/Suggestion
This form is only for KB Feedback/Suggestions, if you need help with the software open a support case
Thank you!
Your feedback has been received and will be reviewed.
Oops! Something went wrong.
Please, try again later.