- Veeam Support Knowledge Base
- How to uninstall Veeam CDP VAIO filter driver manually
How to Uninstall Veeam CDP VAIO Filter Driver Manually
Cheers for trusting us with the spot in your mailbox!
Now you’re less likely to miss what’s been brewing in our knowledge base with this weekly digest
Oops! Something went wrong.
Please, try again later.
This article documents the manual filter driver removal process.
If Veeam Backup & Replication is available, the recommended method for uninstalling the I/O Filter is documented in the user guide.
Veeam Backup & Replication - Updating and Uninstalling I/O Filter
Objective
Solution
Before You Begin
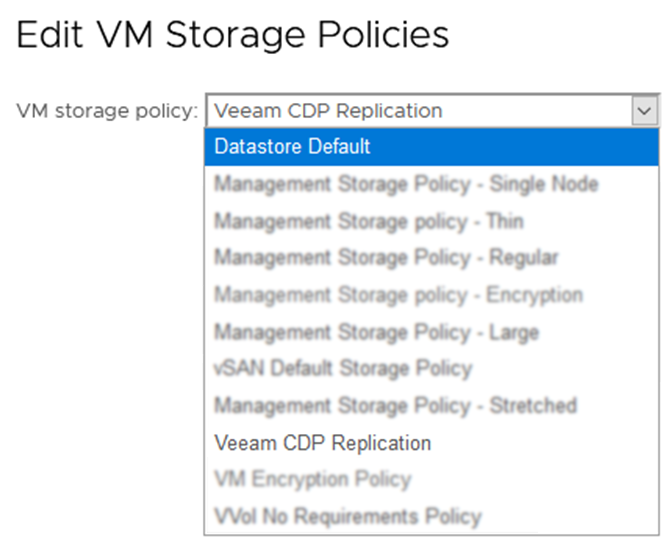
- Prerequisite 1: Change the VM storage policy for all VMs that were protected by Veeam CDP from ‘Veeam CDP Replication’ to ‘Datastore Default’ or another appropriate policy (see screenshot below).
This change only needs to be done to the source virtual machines; the replica virtual machines should be deleted manually.
After deleting the CDP Replica(s), there may be files that VCenter couldn’t automatically delete that will need to be cleaned up manually (i.e., the folder on the datastore which contained the Replica VM).

- Prerequisite 2: The ESXi host(s) must be in maintenance mode to uninstall the CDP filter driver. VMware DRS can help mitigate the impact of this process.
Filter Removal
Use VMware power-cli to uninstall the filter driver with the following PowerShell script.
- Open VMware PowerCLI
- Connect to the vCenter
Connect-VIServer -Server <vcenter-servername>- Run the following command to confirm that the Veeam CDP filter is installed:
Get-VAIOFilter -name veecdp -cluster "<cluster name>"- To remove the Veeam CDP VAIO Filter if present, run the following command:
Get-VAIOFilter -name veecdp -cluster "<cluster name>" | Remove-VAIOFilterSome customers have reported issues within VMware that may prevent removing the VAIO filters related to EAM Certificates.
- VMware KB2112577: "Failed to login to vCenter as extension, Cannot complete login due to an incorrect user name or password", ESX Agent Manager (com.vmware.vim.eam) solution user fails to log in after replacing the vCenter Server certificates in vCenter Server 6.x/7.x/8.x
- VMware KB80588: WCP Service fails to start after replacing vCenter Server certificates
Confirm Filter Removal
Once the filter drivers are removed, exit the ESXi hosts from maintenance mode. You can check the status of the filter driver directly on the ESXi hosts by connecting to them via SSH and running this command:
esxcli software vib list | grep -i vee Remove Storage Policy
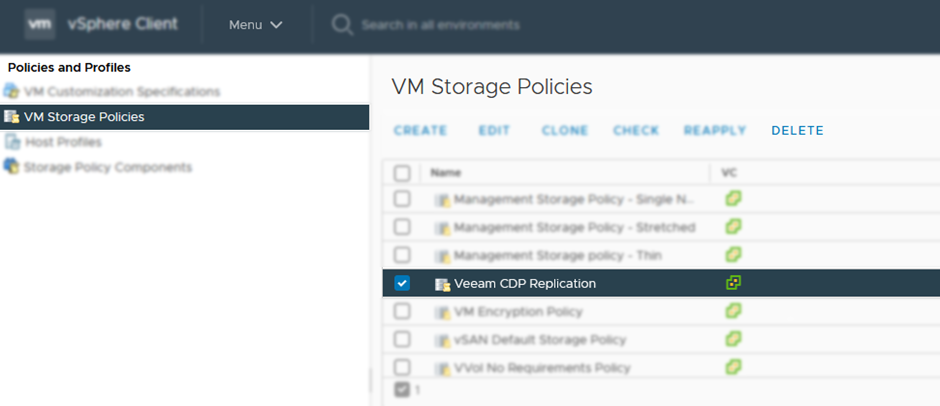
The last step is to remove the “Veeam CDP Replication” storage policy from VCenter.
Go to Menu -> Policy and Profiles -> VM Storage Policies -> select the “Veeam CDP Replication” policy and click delete.

To report a typo on this page, highlight the typo with your mouse and press CTRL + Enter.
Spelling error in text
Thank you!
Your feedback has been received and will be reviewed.
Oops! Something went wrong.
Please, try again later.
You have selected too large block!
Please try select less.
KB Feedback/Suggestion
This form is only for KB Feedback/Suggestions, if you need help with the software open a support case
Thank you!
Your feedback has been received and will be reviewed.
Oops! Something went wrong.
Please, try again later.