- Veeam Support Knowledge Base
- Job fails to create VSS snapshot for SMB share
Job fails to create VSS snapshot for Windows Server SMB share
Cheers for trusting us with the spot in your mailbox!
Now you’re less likely to miss what’s been brewing in our knowledge base with this weekly digest
![]()
Oops! Something went wrong.
Please, try again later.
Challenge
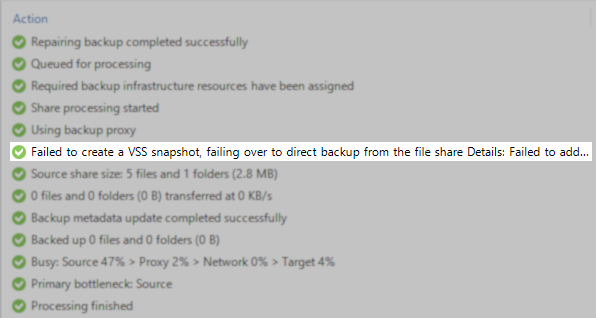
A File Backup/file to tape job skips VSS snapshot creation on SMB share and ends with the following message in the log:
Failed to create a VSS snapshot, failing over to direct backup from the file share
A File Backup job for an SMB3 File Share configured to use Backup from a Microsoft VSS snapshot, with the Failover to direct backup if a snapshot is not available option disabled, fails with:
Failed to prepare VSS resources Error: Failed to call RPC function 'HvVssGetNormalizedRootPath': Failed to get SMB share root path. File name: '\\%hostname%\share\folder'. A Volume Shadow Copy Service component encountered an unexpected error. Check the Application event log for more information.
or
Failed to create a VSS snapshot Error: Failed to add volume [\\TESTVM\SHARE\] to the VSS snapshot set The shadow copy provider had an unexpected error while trying to process the specified operation. --tr:Failed to add volumes to the snapshot set. --tr:Failed to perform pre-backup tasks.
Solution
Requirements
Note: In the section below, reference is made to a General-Purpose Backup Proxy; this role is assigned to the Veeam Backup Server by default. Additional General Backup Proxies can be created as needed, which can be important if the Veeam Backup Server is off-domain or in a segmented domain, per best practices.
Below are the requirements for VSS to function when backing up from an SMB3 share hosted by a Windows File Server:
- The General-Purpose Backup Proxy and the Windows File Server hosting the SMB3 Share must run Windows Server 2012 R2 or later.
- The General-Purpose Backup Proxy and the Windows File Server hosting the SMB3 Share must be joined to the same AD domain.
- The account used to add the SMB3 to Veeam Backup & Replication must be a domain-level account with sufficient permissions to access the share and trigger the VSS snapshot on the Windows File Server hosting the SMB3 Share.
- The File Server VSS Agent Service role must be enabled on the Windows File Server hosting the SMB3 Share.
- The General-Purpose Backup Proxy must be able to resolve both the hostname and IP address of the Windows File Server hosting the SMB3 Share.
For more information on the VSS for SMB File Shares feature, see the following Microsoft page:
https://docs.microsoft.com/en-us/archive/blogs/clausjor/vss-for-smb-file-shares
Enabling File Server VSS Agent Service
Do the following, with administrative privileges, to install the File Server role and the File Server Shadow Copy Agent role service on each file server:
Via the GUI
- In the Server Manager Dashboard, click Add Roles and Features.
- In the Add Roles and Features Wizard, do the following:
- In the Before you begin wizard page, click Next.
- In the Select Installation type wizard page, select Role-based or Feature-based Installation.
- In the Select Destination server wizard page, select the server where you want to install the File Share Shadow Copy Agent.
- In the Select server roles wizard page:
- Expand File and Storage Services.
- Expand File Services.
- Select File Server.
- Select File Server VSS Agent Service.
- In the Select Features wizard page, click Next.
- In the Confirm installation selections, verify that File Server and File Server VSS Agent Service are listed, and click Install.

Using PowerShell
- Start elevated Windows PowerShell (Run as Administrator).
- Run the following command:
Add-WindowsFeature -Name File-Services,FS-VSS-AgentAdd backup user to Backup Operators local group on the File Server
The user context in which the shadow copy is performed must have the backup privilege on the remote file server(s) that is part of the shadow copy set. Usually, this is done by adding the user that is performing the shadow copy to the Backup Operators group on the file server(s).
To add a user to the local Backup Operators group, do the following with administrative privileges on each file server:
Via the GUI
- In the Server Manager Dashboard, click Tools and select Computer Management.
- In Computer Management:
- Expand Local Users and Groups.
- Click Groups.
- In the results pane, double-click Backup Operators.
- In the Backup Operators Properties window, click Add.
- Type the username to add to the Backup Operators group, click OK.
- In the Backup Operators Properties page, click OK.
- Close Computer Management.
Using PowerShell
- Start elevated Windows PowerShell (Run as Administrator)
- Run the following commands, adjusting the user account and file server name to your environment:
$objUser = [ADSI]("WinNT://domain/user")
$objGroup = [ADSI]("WinNT://fileserv/Backup Operators")
$objGroup.PSBase.Invoke("Add",$objUser.PSBase.Path)To report a typo on this page, highlight the typo with your mouse and press CTRL + Enter.
Spelling error in text
Thank you!
Your feedback has been received and will be reviewed.
Oops! Something went wrong.
Please, try again later.
You have selected too large block!
Please try select less.
KB Feedback/Suggestion
This form is only for KB Feedback/Suggestions, if you need help with the software open a support case
Thank you!
Your feedback has been received and will be reviewed.
![]()
Oops! Something went wrong.
Please, try again later.