- Veeam Support Knowledge Base
- How to add SMB repository to Veeam Backup for Microsoft 365
How to add SMB repository to Veeam Backup for Microsoft 365
Cheers for trusting us with the spot in your mailbox!
Now you’re less likely to miss what’s been brewing in our knowledge base with this weekly digest
Oops! Something went wrong.
Please, try again later.
For more information, see KB4567: Planned Veeam Backup for Microsoft 365 Feature Deprecation.
SMB repository is considered as experimental support in the current version.
If a storage device supports both SMB 3.0 and iSCSI protocol, the best practice would be to use iSCSI due to its use of Disk Queue, which acts as a buffer space for data to land on before being sent off to disk.
Purpose
This article covers two most popular scenarios of adding an SMB 3.0 repository to Veeam Backup for Microsoft 365
Note: If the SMB 3.0 share is a Windows-based shared folder, then it is recommended to add the server it’s based on as a proxy and connect the same storage as a directly attached disk.
Cause
Solution
Scenario 1: Microsoft Windows SMB share with authorization
Prerequisites:
- To use the SMB 3.0 share as a storage system, make sure you are using Windows 8/Server 2012 or later; older OS versions do not support the SMB 3.0 share as a storage system.
- The Veeam Servers and the SMB share location must be deployed within the same or a trusted domain.
Configuration
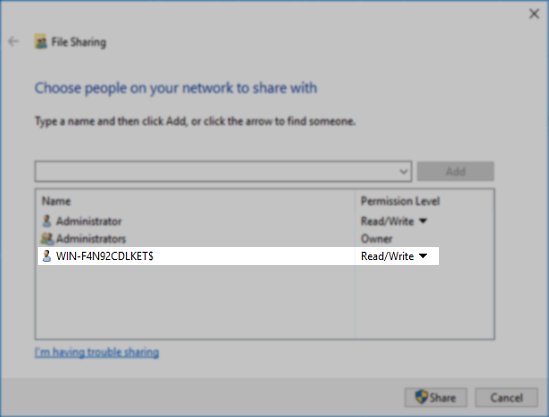
- Open folder sharing settings for planned repository location and add all Veeam servers using their computer names.
For example, if your Veeam server is called WIN-F4N92CDLKET, the list would look like this:

- Add the SMB 3.0 repository to Veeam Backup for Microsoft 365.
Scenario 2: Standalone storage appliance
In this example, we will use a Synology appliance, but the same method should work for any standalone device that supports Microsoft Active Directory and its computer groups.
- Add the Veeam server and all remote backup proxies (if any) to the Active Directory domain.
- Create an Active Directory group in this domain and add all Veeam servers to it as “computer” objects:
- Add the storage device to the same domain:
- Make sure that SMB 3.0 protocol is enabled, and previous versions are not allowed to use:
- Create SMB shared folder and grant read/write access to it for the domain group that was created earlier:
- Add the SMB 3.0 repository in Veeam Backup for Microsoft 365.
Scenario 2 Alternate: Add standalone storage appliance using iSCSI protocol (Best Practice)
In this scenario, we will use the Synology appliance as an example, but the same method would work for any storage appliance that supports the iSCSI protocol.
- Within the Storage Appliance, open the iSCSI manager and create a new LUN and Target:
- On the Veeam Backup for Microsoft 365 server:
- Open the iSCSI Initiator
- Enter your storage appliance IP address
- Click “Quick Connect…”
- Click “Done”
- Open Disk Management, bring the iSCSI disk online, and initialize it using default parameters:
- Create a new simple volume using default parameters:
- Create a new repository for the disk in Veeam Backup for Microsoft 365.
To report a typo on this page, highlight the typo with your mouse and press CTRL + Enter.
Spelling error in text
Thank you!
Your feedback has been received and will be reviewed.
Oops! Something went wrong.
Please, try again later.
You have selected too large block!
Please try select less.
KB Feedback/Suggestion
This form is only for KB Feedback/Suggestions, if you need help with the software open a support case
Thank you!
Your feedback has been received and will be reviewed.
Oops! Something went wrong.
Please, try again later.