As your business embraces Amazon Web Services (AWS), it is imperative to ensure that your data remains secure/protected and you are minimizing costs. One of the ways to increase security and minimize costs in AWS is through a Gateway Endpoint.
Let us first understand what a Gateway Endpoint does. Quite simply, it allows you to connect to an AWS service (ie: Amazon S3, DynamoDB), utilizing the AWS network. This means that:
- Data/traffic will not have to traverse the public internet
- No data egress charges will be incurred
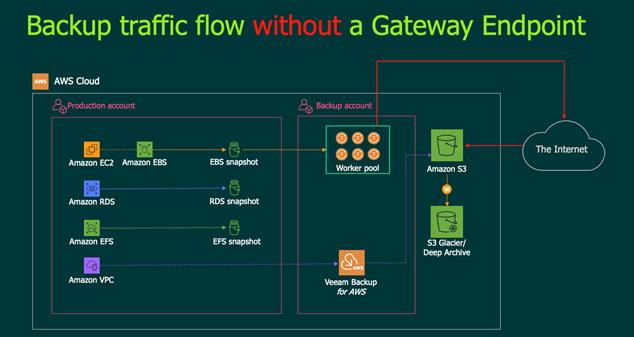
The following diagram highlights the flow of traffic if a gateway endpoint is not configured:
- When a Veeam scale-out backup repository is configured in a EC2 instance, and you are offloading to S3
- A Veeam Backup for Microsoft 365 proxy server(s) are deployed within AWS
- Performing a direct restore into AWS from S3
The next logical question is, what happens when a Gateway Endpoint is configured?
We can see that the Gateway Endpoint will allow the EC2 instance to connect with S3 bucket and not have the traffic traverse the Internet.
Let’s now step through how to create a gateway endpoint. Once logged into the AWS console, make your way to the VPC dashboard and select “Create Endpoint” when on the “Endpoints” dashboard:
You will now see a listing of possible endpoints that can be created. The easiest way to find/select a S3 gateway endpoint will be to filter on “s3”. Be aware that the region name will be included in the service name. Since I am using the Canada Central region, “ca-central” will be part of the service name:
Now you can select the applicable VPC where the gateway endpoint will be created in:
For whichever route table(s) are selected, AWS will automatically add a route to the gateway endpoint for all S3 traffic.
Now you can select the applicable policy — “Full Access” or Custom.
The gateway endpoint is now created… it is that easy!
Let’s look at the route table entries that have been created to get a better understanding of that is occurring under the covers.
Step 1: We can see the endpoint has been created and that there is an associated route table. Select the “Route Table ID”:
Step 2: Select the “Routes” tab and you will see an AWS managed “prefix list” in the destination column. A “prefix list” is a set of one or more CIDR blocks. You can use prefix lists to make it easier to configure and maintain your route tables.
The purpose of the new route will be to direct S3 bound traffic to an S3 bucket via the gateway endpoint… not via the internet/internet gateway.
Note that the “Prefix List” route table was not present before the gateway endpoint was created.
Step 3: When we click/investigate the added “Prefix list” (pl-*****), the list of CIDR block addresses for the S3 endpoints in the applicable region will be shown.
Believe it or not, it is that simple! From a Veeam configuration point of view, there is nothing required as the routing changes will transparently occur in the background… and Veeam just works!
Now that the Gateway Endpoint has been configured, you can be assured that your Veeam backup data will remain within AWS and there will be no unexpected egress charges.


